I was going to cook today. But instead, Sam tricked me into going over to his house to do P90X. "Don't worry, Sunny, cardio is the fun one!!"
It was not fun. It was so un-fun that Titan ran away and shut the bedroom door behind him, and he doesn't even have opposable thumbs. 20 minutes in, I almost threw up and fainted. Good thing it was almost.
Tuesday, May 31, 2011
Larb (Thai chicken salad) with Lettuce Wraps

This recipe is dedicated to my good friend Laura. I visited her over the memorial day weekend, and failed to deliver larb from Lemongrass (our old place of employment), so am compensating by trying to recreate the dish for her. And then eat it for her. I guess no where in this scenario does she actually get to eat the larb. Opps.
Larb is a meat salad (chicken, pork, beef, turkey, etc.) that is very popular in Laos and parts of Thailand. I had never heard of it or tried it before waiting tables at Lemongrass. It sounds weird and not really very appetizing, but if you're anything like me and like spiciness and tanginess, you might appreciate this. During the summer, I try to "cook" as little as possible because of how darn hot it gets, so these salads are the way to go! I made mine with chicken, you can feel free to experiment on your own. I guess traditionally, the meat is minced, but I went with the ground version.
Dressing
:: 1/4 cup fish sauce
:: 1/2 cup lime juice
:: 1 tbsp sugar, or to taste
:: chili paste or chili garlic sauce to taste (I used 2 tsp)
:: 3/4 cup chicken broth :: 1 1/2 pound ground chicken
:: 1 cup scallions, chopped
:: 3 tbsp chopped lemongrass
:: 1/2 cup cilantro, chopped
:: 1/3 cup mint, chopped
:: lettuce (romaine, butter, Boston) separated into leaves for wrapping
Mix the first 4 ingredients together until the sugar dissolves. Set aside.
Heat the chicken broth to boiling and cook the chicken, scallions, and lemongrass in it until the chicken is cooked through and most of the liquid has cooked off, about 10-15 minutes.
Remove from heat, toss in cilantro and mint.
Stir in sauce. Season with s&p if needed. Serve in lettuce cups!
Thursday, May 26, 2011
Portobello Marsala
 Does anyone know how to spell portobello? Portabella?! I don't know.
This recipe was actually supposed to be chicken marsala for dinner tonight, but I forgot to defrost the chicken and so now all we have are mushrooms. Which turned out to be just fine.
Marsala (not be confused with masala, a blend of spices commonly used in Indian and SE Asian cuisine) is a fortified wine, which I have never in my life had as a beverage. In fact, the only marsala I've ever purchased has been in the cooking section of the supermarket, which has salt and other things added to it, rendering it undrinkable. It has a distinctive taste and is not really substitutable with red or white wine. It goes great with mushrooms, and as you will see, I used whatever I had at home, but you can use whatever crazy combinations of mushrooms you have - button, cremini, portobello, you name it.
Ingredients:
:: 2 portobello caps, thinly sliced and cut into thirds or bite-sized pieces
:: 1/2 pound creminis, stems removed, thinly sliced:: 3 cloves garlic, finely minced
:: 2 tbsp olive oil
:: 2 tbsp butter
:: 1/2 onion or 2 shallots, chopped
:: 2 tbsp flour
:: 1/2 cup marsala wine
:: 1 cup chicken stock
:: 1/4 cup heavy cream or half-and-half (optional):: handful parsley, chopped (optional)
:: 1/2 box pasta, I like linguine!
:: 1/2 box pasta, I like linguine!
Boil a giant pot of water, salt it, and cook pasta according to the box directions.
Melt olive oil and butter over medium heat. And no, I am not crazy for using both. Butter tastes great, but the milk solids burn. Adding the oil allows you to cook at higher heat without that being a big issue. Let the garlic cook until aromatic, about 1 minute. Add onion or shallots, cook until soft, about 5 minutes.
Add in all the mushrooms and cook until they begin to brown, about 10 minutes. Usually, when making chicken or veal marsala, the cutlets are dredged in flour, seared, and then liquid is poured on top. The flour serves not only to give the meat a nice brown sear, but also helps to thicken the sauce. Since I am skipping this step (which you are more than welcome to do!), I added in 2 tbsp flour to the mushrooms and cooked it a little longer so that when the liquids are added in, they will thicken into a nice creamy sauce.
Looks like a lot of mushrooms, doesn't it? They cook down to virtually nothing!
 I hope you're salting and pepper-ing along the way!
Pour in wine, deglaze the pan and scrape up any brown bits. Turn up to high heat and let boil for 30 seconds. Pour in chicken stock, let cook for another 5-10 minutes until the sauce thickens. You can add in cream at this stage if you are using it, or a little more wine if the marsala flavor has been diluted. Parsley goes in at the very end, right before you serve this to the table.
Grated cheese? Yes, please!
 I've also served this over simple garlic mashed potatoes. Yum!
 Prosciutto and Fresh Mozzarella Crostinis with Basil Oil
 I admit it. I totally ripped this idea off from Orzo, one of my favorite restaurants in town. They serve this as one of their lunch or dinner appetizers, and despite the $9 price tag for just two (albeit large!) crostinis, it hasn't prevented me from ordering it every single time I eat there. The portions are generous, relatively speaking when it comes to prosciutto di parma anyway, and the salt of the meat along with the creaminess of the cheese and crunch of the bread and herbiness of the oil......... sorry for making you listen to my food daydreams.
 Me and T decided that it was ridiculous how much money we have spent on this stupid appetizer so are attempting to recreate it ourselves. The discerning reader will point out "But Sunny, you spent way more than $9 on these ingredients alone!". And you would be right. But that's because you forgot how many portions I intend to make.
Prosciutto is a slowly dry-cured ham, most famously from Italy. It is buttery smooth and very salty, so is usually served in ultra thin slices. I made a special trip to Feast! just to buy the higher quality prosciutto because I guess it's go-hard-or-go-home and I wanted this to be just right. I opted for the prosciutto di parma, since the next option was a locally made prosciutto that cost (this is hard for me to even type it....) $50 per pound. Since I am not Bill Gates, the cheaper one was perfectly suitable for my needs.
I used an Albemarle Baking Co. baguette, which I think are very good, but to be completely truthful (dare I say, even blasphemous?), I'm not sure they are worth $3.
I used an Albemarle Baking Co. baguette, which I think are very good, but to be completely truthful (dare I say, even blasphemous?), I'm not sure they are worth $3.
Basil Oil
:: 1 bunch basil, stems removed (about 1 cup?)
:: 1/2 cup oil - this is one instance where using a canola or vegetable or other unflavored oil might be better than olive oil so that it doesn't drown out the flavor of the basilBoil a pot of water. Put basil in for 30 seconds. Take basil out, rinse under cold water.
This technique is called blanching, where you cook something very briefly in hot water and then shock it in cold to stop the cooking. It keeps your veggies looking bright and green and fresh tasting.
Pat dry (important!), add basil and oil into blender. I had to add in a little more oil than pictured below. Salt and pepper to taste while blending!
 Mmm... isn't that the prettiest baby food you've ever seen?!
 Assembling the crostini
Ingredients:
:: 1 baguette, sliced on the bias about 3/4" thick
:: 1 ball fresh mozzarella, sliced
:: 2 slices prosciutto
:: basil oil
Grill the baguette slices if desired. I have an electric stove, much to my dismay, but did it on a dry pan over medium high heat; you could of course brush with some oil.
Pour a little basil oil down on a plate. Place grilled baguette slice on plate, layer mozzarella and then prosciutto on top. Insert baguette into mouth, bite, chew, and understand what all the fuss is about.

Tuesday, May 24, 2011
Miso Dressing
I like miso for a lot of reasons.
1) It makes a delicious soup.
2) It makes a delicious marinade.
3) It makes a delicious dressing for salads.
4) It is deliciously salty.
Today, we're talking about Reason #3 to like miso. There won't be any pictures, because to be honest, it ends up looking like brown baby food with sesame seeds sprinkled in.
I guess there a ton of different types of miso (white miso, red miso...), each are made slightly differently from fermented rice, soybeans, and some other ingredients (tasty, huh?) that vary in color, taste, years aged, etc.
It typically comes in a refrigerated tub that ought to last you a good while. Since it's so salty, there isn't a huge hurry to eat it all up, although it might be so good that shelf life isn't even an issue. I don't know enough to talk about the nuances of the types, all I can tell you is that I bought the cheapest variety in the store. It is a red miso, which according to my good friend Wikipedia is older and saltier than the white variety. Then again, Wikipedia also has this tidbit of information.
"Some, especially proponents of healthful eating, suggest that miso can help treat radiation sickness, citing cases in Japan and Russia where people have been fed miso after the Chernobyl nuclear disaster and the atomic bombings of Hiroshima and Nagasaki. Notably, Japanese doctor Shinichiro Akizuki, director of Saint Francis Hospital in Nagasaki during World War II, theorized that miso helps protect against radiation sickness."
I mean, maybe, but I don't suggest you go around tempting fate by eating miso covered plutonium rods or anything like that.
This dressing would be great on just a plain salad, but the one I made tonight was of corn, red onion, and cucumber. Had I used more foresight while shopping instead of just buying vegetables willy-nilly, maybe I would have purchased an avocado, which would have made this even yummier. I guess you could just throw this on top of a plain avocado....drool.
Ingredients:
:: 2 tbsp miso
:: 2 tbsp rice vinegar
:: 3 tbsp mirin (japanese sweet cooking wine)
:: 1-2 tbsp water, depending on how you would like the consistency of your dressing
:: a few drops of sesame seed oil
:: 1 chopped scallion (optional)
:: 1 tsp sesame seeds (optional)
Mix them all together...... enjoy the magic!
This recipe makes about 1/2 cup, too much for 1 person probably, but the rest will keep in the fridge for about a week or so. If you didn't want to spring for mirin, I guess you could add in a bit more water and vinegar, and then add 1-2 tsp of plain white sugar. I haven't tried it, but it might be close to the right taste. Or if you have cooking rice wine, that would probably work, too. I would definitely not use sherry, marsala, or any of the other more intensely flavored cooking wines, though.
Final thought: sriracha and miso dressing together. I'm just saying.
Monday, May 23, 2011
Shrimp and Tabbouleh Salad
The unfinished product.....

I've been eating a little bit too richly. T and I have made a resolution to try to eat less meat (especially red meat) and eat more vegetables. It's starting to get easy to do that since all the summer produce is starting to come out, and buying a friggin' cucumber no longer makes a girl go broke.
So today for dinner, inspired by a dish my little sister Jackie's made for Mother's Day a few weeks ago, I made Shrimp Tabbouleh Salad, adapted from a Bobby Flay recipe. This recipe uses ingredients that are pretty commonplace household ingredients, and the tabbouleh and shrimp use an extremely similar marinade.
Perhaps it is a misnomer to call this tabbouleh; it's not a 'traditional' tabbouleh at all, which is usually predominated by parsley, mint, tomato, and onion. I still think that the lemon and tang of it satisfies the taste I look for in a tabbouleh.
(Serves 4 as an appetizer salad, 2-3 as a meal)
Ingredients:
:: 1 cup cracked bulgur
:: 2 cups boiling water
:: 1/3 cup lemon juice (about 2 lemons)
:: 1 clove garlic
:: 1 1/2 arugula leaves
:: 3 scallions, chopped
:: 3 tbsp mint, chopped
:: 1/4 cup olive oil
:: s & p, to taste
if shrimp are desired..
:: 1 pound shrimp, deveined, peeled except for tails
:: 1/4 cup lemon juice
:: 1 clove garlic
:: 2 tbsp olive oil
:: s & p
Bulgur is a wheat product that is supposed to have more good things (fiber, protein, vitamins and minerals) and a lower glycemic index than other refined wheat products. It has a nice nutty flavor with more of a bite (like brown rice) than plain pasta.

Arugula, (not pictured above, oops), if you've never had it, is bright and peppery, and could probably be substituted with another green, but has a quite nice contrast with the lemon and more mild tasting mint and scallions.
Boil the water, pour the bulgur in. Turn off heat, cover with a lid and let the bulgur cook as you prepare the rest of the ingredients. (Isn't this easy already?)
I zest my lemons as I juice them, because I figure you should use all parts of the fruit. Skip that step if you'd like (I usually zest only 1 lemon out of however many I actually use). As a rule of thumb that whatever I add lemon juice to, lemon zest is a good addition to as well.
After you chop 1 clove of the garlic, pour the 1/3 cup of lemon juice over the garlic. Raw garlic can have too unpleasant of a bite - I'm sure you've experienced the extremely tenacious garlic-dragon-breath that can happen after eating a too raw clove. Or at least I hope that's not just me?
Letting the acid sit on top helps mellow out the taste without getting rid of it completely. Set aside and let the lemon and garlic macerate before adding in the olive oil.
In a separate bowl where you have placed the raw shrimp, add the remaining 1/4 cup of lemon juice and 1 clove of garlic. Add 2 tbsp olive oil and pour over the deveined and peeled shrimp. You can add 1 tsp of salt and liberally pepper at this stage. Set aside and let marinate at least 10 minutes.
At this point, the bulgur should be pretty much cooked. You can always follow the box directions, but I usually just taste it and make sure that the grains are cooked enough to be pleasantly chewy without being hard. Drain the bulgur.
Now seems like a good time to introduce my loyal, regal, non-opposable thumbed sous chef, Sophie. She doesn't actually cook much, to be honest, but she is a heck of a cheerleader and especially talented about being underfoot when I'm carrying heavy hot things and trying not to trip over her 10 pound body.
 Add olive oil to the lemon, zest, garlic mixture. Mix the whole mess in with the bulgur. Toss in scallions and chopped mint. Salt and pepper to taste. Arugula can be added in immediately before serving, otherwise it will get too soggy.
I cut my scallions on a bias, meaning diagonally instead of perpendicularly to the stem. This makes no difference whatsoever except a change in aesthetics, and for making me feel fancier of a cook than I actually am. The mint could be rolled up like a cigar and finely julienned (cut perpendicularly to the 'cigar' to make very thin strips), but I opted for a nice rough chop instead.
 The shrimp is best served grilled, but I didn't have the patience to light charcoal today, so I just did it over the stovetop over med-high heat for a little over a minute on each side. Don't overcook the shrimp! Taste testing is highly encouraged :)
 After cooling, toss them in with the salad. This is a type of dish that gets better the longer you let it sit. 2 hours minimum would be ideal, and it tastes just fine the next day.
Before...

After!....
 If you'll notice, there is no arugula in the above-pictured salad. That is because I got too hungry and hasty (yet again) and started to eat it before the salad was complete. In fact it's probably not even a salad because the only green things in it are 5% scallions and mint. When I eat it for lunch tomorrow, I will add in the arugula, but I'm assuming I'll also be too hungry then to take a proper picture of the finished product. I suppose you'll just have to imagine it with more green things in it :)
And just because these are beautiful...

On an unrelated note, happy graduation and congratulations to the new Doctors of the Class of 2011! And to the new Doctor Doctors, and Doctor Masters, and whatever other degrees you all have accumulated over the years. Best of luck in your professional and personal endeavors....and hooray for no 30-hour-call days!! (we think this is a good thing, anyway.)
Wednesday, May 18, 2011
Braised Lamb Shank
Ohh, lamb. I grew up never eating lamb because 5/6 members of my immediate family thought it was gross. I finally stopped whining long enough to taste it, and my life was forever changed. Now the lamb-lovers in my family number 3/6 (me, my sister, my dad)- not a bad improvement from just 1!
Since I've been staying at my parents' house as a mini vacation for the last two weeks, and since my dad, my sister and I don't usually get the chance to eat it (it's not fun cooking all day for yourself!), we've made this dish twice in 12 days. Too much saturated fat, you say? Probably.
Lamb shanks are delicious, especially when cooked like this. The bone marrow adds a rich unctuousness to the tomato sauce, and perfumes the whole stew with a lamb-y taste. Lamb shank is probably not the least gamey of cuts, and this dish has pretty concentrated flavors, so keep that in mind if serving it to the lamb-naive.
Braised Lamb Shank
(Serves 4-6 as an entree)
Ingredients:
:: 4 lamb shanks, total 3.5-4 pounds , rinsed, and patted dry
:: 1/2 cup flour (optional)
:: 8 cloves garlic, chopped
:: 3 carrots, cut into fourths
:: 3 stalks celery, cut into fourths
:: 1 1/2 onion, chopped into 1 inch pieces
:: 28 oz. canned whole peeled tomatoes (preferably San Marzano)
:: 2 cups red wine
:: 3 cups water
:: 1 tall stockpot
:: 2 sprigs rosemary
:: 10-15 sprigs thyme
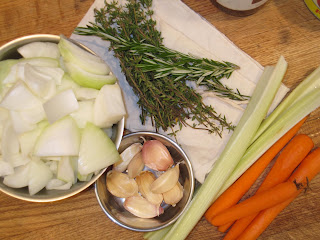
This is obviously pre-food prep stage. The thyme and rosemary are sitting on top of the "spice sack" I use to keep my herbs separated from the actual edible portions of the dish. The spice sack is a glorified cotton bag with a drawstring that you can just throw into the pot.
 Throw the celery and carrots into a food processor or blender with just enough water to keep the blade from blending air. You'll have a slurry like this, but with hopefully less water than my enthusiasm resulted in.
 Liberally salt and pepper the shanks and dust them in a light coat of flour. You can skip the flour step, but I like the way it helps to brown the meat.


In a wide pan, add a tablespoon or so of oil, just enough to keep the lamb from sitting on any dry spots. Brown about 3 minutes on each side. Be patient! I don't mean "give the meat a tan", I mean brown it! Set it aside while you cook the veggies.

Cook the carrot slurry and garlic in 1 tablespoon of oil until the liquid is cooked out.
Add in the onions with another tablespoon of oil and saute for a while. You want the vegetables to start to caramelize and brown. Hopefully you can see little specks of brown forming in this picture.

 Add in the tomatoes and red wine. Cook about 15 minutes or until the sauce is somewhat reduced (I can never tell how much "reduce by half" really means...). Now, I am typically not a tomato snob, but when making a special dinner like this where the flavors become concentrated, I think it's worth the splurge for San Marzano tomatoes. I don't know how they're different, except for that they are from Italy and are many times more delicious than normal tomatoes (which I choose 99% of the time over San Marzanos purely for cost reasons.)

This is where you can add in other "spices" besides thyme and rosemary. I was rummaging through the pantry when I found a lamb rub I had made for father's day a couple years ago. (yeah, yeah, I know, throw your spices out after 6 months.....)
I wish I remembered what went into it but it was some combination of coriander, cumin, allspice, salt, pepper, garlic, cinnamon, and nutmeg that I had run through a coffee grinder. Those are at least the ingredients that I recall. Adding these obviously changes the flavor of the dish a lot and makes it taste more Moroccan in flavor, but using the thyme and rosemary as stand alone spices is great, also!
Now you'll need the large stockpot. You will want to cover the lamb shanks with liquid and since they are so long, cooking 4 requires a tall pot. You could probably get away with a 4-qt saucepan if cooking 2 shanks, but remember that not only must you be able to jam them in, but you will also need to cover them with a lid. I had no rulers lying around, so the most standard unit of measure I could come up with is that I used a stockpot at least 1.5 McDonald's Apple Pies tall. Throw the lamb in the pot and pour the tomato mixture over it. The shanks will be sticking out of the liquid.
 Cover the shanks with water, about 3 cups. Throw in your thyme and rosemary.
 Pop the lid on, and into a 400 degree oven it goes. You can check up on it every hour or so if you, like me, have an insatiable curiosity to see how your food is looking. Cook it for about 3 hours, or until its tenderness is to your liking.
 Tada! I ate mine today with sun-dried tomato and toasted pine nut quinoa, because sometimes I do like to eat healthy things :)

Since I've been staying at my parents' house as a mini vacation for the last two weeks, and since my dad, my sister and I don't usually get the chance to eat it (it's not fun cooking all day for yourself!), we've made this dish twice in 12 days. Too much saturated fat, you say? Probably.
Lamb shanks are delicious, especially when cooked like this. The bone marrow adds a rich unctuousness to the tomato sauce, and perfumes the whole stew with a lamb-y taste. Lamb shank is probably not the least gamey of cuts, and this dish has pretty concentrated flavors, so keep that in mind if serving it to the lamb-naive.
Braised Lamb Shank
(Serves 4-6 as an entree)
Ingredients:
:: 4 lamb shanks, total 3.5-4 pounds
 , rinsed, and patted dry
:: 1/2 cup flour (optional)
:: 8 cloves garlic, chopped
:: 3 carrots, cut into fourths
:: 3 stalks celery, cut into fourths
:: 1 1/2 onion, chopped into 1 inch pieces
:: 28 oz. canned whole peeled tomatoes (preferably San Marzano)
:: 2 cups red wine
:: 3 cups water
:: 1 tall stockpot
:: 2 sprigs rosemary
:: 10-15 sprigs thyme
This is obviously pre-food prep stage. The thyme and rosemary are sitting on top of the "spice sack" I use to keep my herbs separated from the actual edible portions of the dish. The spice sack is a glorified cotton bag with a drawstring that you can just throw into the pot.
 Throw the celery and carrots into a food processor or blender with just enough water to keep the blade from blending air. You'll have a slurry like this, but with hopefully less water than my enthusiasm resulted in.
 Liberally salt and pepper the shanks and dust them in a light coat of flour. You can skip the flour step, but I like the way it helps to brown the meat.

In a wide pan, add a tablespoon or so of oil, just enough to keep the lamb from sitting on any dry spots. Brown about 3 minutes on each side. Be patient! I don't mean "give the meat a tan", I mean brown it! Set it aside while you cook the veggies.

Cook the carrot slurry and garlic in 1 tablespoon of oil until the liquid is cooked out.
Add in the onions with another tablespoon of oil and saute for a while. You want the vegetables to start to caramelize and brown. Hopefully you can see little specks of brown forming in this picture.

 Add in the tomatoes and red wine. Cook about 15 minutes or until the sauce is somewhat reduced (I can never tell how much "reduce by half" really means...). Now, I am typically not a tomato snob, but when making a special dinner like this where the flavors become concentrated, I think it's worth the splurge for San Marzano tomatoes. I don't know how they're different, except for that they are from Italy and are many times more delicious than normal tomatoes (which I choose 99% of the time over San Marzanos purely for cost reasons.)
This is where you can add in other "spices" besides thyme and rosemary. I was rummaging through the pantry when I found a lamb rub I had made for father's day a couple years ago. (yeah, yeah, I know, throw your spices out after 6 months.....)
I wish I remembered what went into it but it was some combination of coriander, cumin, allspice, salt, pepper, garlic, cinnamon, and nutmeg that I had run through a coffee grinder. Those are at least the ingredients that I recall. Adding these obviously changes the flavor of the dish a lot and makes it taste more Moroccan in flavor, but using the thyme and rosemary as stand alone spices is great, also!
Now you'll need the large stockpot. You will want to cover the lamb shanks with liquid and since they are so long, cooking 4 requires a tall pot. You could probably get away with a 4-qt saucepan if cooking 2 shanks, but remember that not only must you be able to jam them in, but you will also need to cover them with a lid. I had no rulers lying around, so the most standard unit of measure I could come up with is that I used a stockpot at least 1.5 McDonald's Apple Pies tall.
 Throw the lamb in the pot and pour the tomato mixture over it. The shanks will be sticking out of the liquid.
 Cover the shanks with water, about 3 cups. Throw in your thyme and rosemary.
 Pop the lid on, and into a 400 degree oven it goes. You can check up on it every hour or so if you, like me, have an insatiable curiosity to see how your food is looking. Cook it for about 3 hours, or until its tenderness is to your liking.
 Tada! I ate mine today with sun-dried tomato and toasted pine nut quinoa, because sometimes I do like to eat healthy things :)
Tuesday, May 17, 2011
Pad Thai
Pad Thai is the quintessential Thai street food. It is tangy and sweet and salty and delicious. If you've never had it, you are missing out, and it's time to try it! I love pad thai with shrimp and tofu, but it's good no matter what protein you put in it, or even if there is none at all.
And please...don't call it "pad thigh".
(4-5 servings in my house, but it would probably feed 6-8 more reasonable people)
Ingredients:
Pad Thai sauce:
:: 1/2 cup water
:: 1/2 cup fish sauce
:: 1/2 cup white sugar
:: 1/2 cup lime juice
:: 3 tablespoons tamarind pulp
Stir Fry ingredients:
:: 1 package rice stick noodles. I prefer medium width, use whatever you like.
:: canola oil (or another high smoke point oil. I wouldn't recommend olive)
:: 6 cloves garlic
:: 4 eggs, beaten
:: 1 pound shrimp
:: 1 package extra firm tofu, chopped into 1/2 inch cubes and patted dry.
:: chili powder
:: chopped scallions (optional)
:: chopped peanuts (optional)
:: lime wedges (optional)
2 hours before cooking, soak the rice stick noodles in COLD water. You can cut them with scissors, as they are extremely long and unmanageable to stir fry as is from the store.
Pad Thai sauce
The leftover sauce will keep in the refrigerator for a little while if you don't finish using it the day of, but I would probably throw leftovers out in 1-2 weeks.
Heat the 5 ingredients (lime juice, fish sauce, sugar, water, tamarind pulp) over medium heat. You only need to cook it long enough to dissolve the sugar and break up the tamarind. You will need to strain the sauce, I just use a slotted spoon. Little specks of tamarind are fine, giant chunks are....unpalatable.
(At this point, one of my friends threw away her sauce because she said that it smelled terrible and she had obviously done something wrong. Fish sauce smells terrible. Hot fish sauce smells even worse. Somehow, though, the combination of these ingredients transforms into something delicious, even if it doesn't smell like roses. You're doin' it right, now keep going.)
Not pictured below: tamarind pulp. Oops, sorry. It is a dark brown sticky mess that is packaged into a dense rectangular shape. I literally cut off chunks with a knife, or take a hard spoon (don't laugh, I've actually bent spoon handles trying to dig out chunks) to take off the pieces I need. Tamarind pulp is probably not an optional ingredient for pad thai, but luckily it has never been hard to find in asian grocers. It is sour and sweet!
 Set aside to use while you cook.
Stir Fry
Heat a large pan, or wok over medium high heat. You will pan fry the shrimp, eggs, and tofu separately so that they are 80% cooked by the time you start to stir fry the noodles. By all means, substitute the shrimp or tofu with anything or nothing else, but please, please at least keep the egg. It is just so good and pad thai without eggs is like...a burger without a patty. Or something equally dramatic.
 Cook the tofu in 1 tablespoon of oil and 1 teaspoon garlic. Let them fry until they begin to turn golden brown. Set aside.
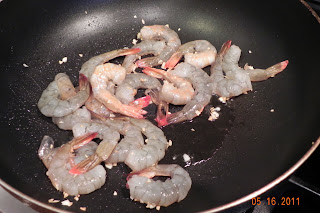
 Cook the shrimp in 1 tablespoon of oil and 1 teaspoon garlic. Fry them 90 seconds on each side or until both sides are pink. Set aside.
 Cook the eggs in 1 tablespoon of oil and 1 teaspoon garlic. Cook just until they are not runny, and look slightly shiny. Do not overcook! Set aside.
 Drain the noodles. You MUST MUST MUST cook noodles in batches. With one package of noodles, I like to cook it in 3 batches.
Please trust me on this. T and I learned one hungry evening how essential this step was. We were too impatient to take the time for this extra step and ended up with a sticky, gunky mess of essentially...steamed noodles. While still good, it was such a waste of what would have otherwise been a wonderful meal.
Take 1/3 of the noodles and begin stir frying them over the highest heat your stove has with 2 tablespoons of oil and 1/3 of the remaining garlic. I know it probably sounds like we've used a ton of oil so far, but let's face it - pad thai is not low-cal dining. I use as little as I can get away with while still having a good end result.
Ladle in 1/5 of the sauce. Just eyeball it, you can be liberal, but like always, taste as you go along. Add in a teaspoon of chili powder. This really helps to make the color of the pad thai 'pop', and gives it that reddish orange hue we so love to see.
 Stir fry this for a minute or two, until the noodles become less rigid and more pliable. Add in 1/3 of the shrimp, tofu, and egg. Since the proteins should more or less be cooked anyway, at this point we are just reheating them and making sure the noodles are well cooked.
 Stir fry them until al dente, STOP before they become mushy! If you are convinced it is too dry, add a few drops of oil and water and keep going. Taste the noodles. Once they have a nice toothsome bite, stir in some scallions if desired and dump them out on a plate.
You can serve chopped peanuts, bean sprouts, scallions, and lime wedges on the side as garnish if you like!

And please...don't call it "pad thigh".
(4-5 servings in my house, but it would probably feed 6-8 more reasonable people)
Ingredients:
Pad Thai sauce:
:: 1/2 cup water
:: 1/2 cup fish sauce
:: 1/2 cup white sugar
:: 1/2 cup lime juice
:: 3 tablespoons tamarind pulp
Stir Fry ingredients:
:: 1 package rice stick noodles. I prefer medium width, use whatever you like.
:: canola oil (or another high smoke point oil. I wouldn't recommend olive)
:: 6 cloves garlic
:: 4 eggs, beaten
:: 1 pound shrimp
:: 1 package extra firm tofu, chopped into 1/2 inch cubes and patted dry.
:: chili powder
:: chopped scallions (optional)
:: chopped peanuts (optional)
:: lime wedges (optional)
2 hours before cooking, soak the rice stick noodles in COLD water. You can cut them with scissors, as they are extremely long and unmanageable to stir fry as is from the store.
Pad Thai sauce
The leftover sauce will keep in the refrigerator for a little while if you don't finish using it the day of, but I would probably throw leftovers out in 1-2 weeks.
Heat the 5 ingredients (lime juice, fish sauce, sugar, water, tamarind pulp) over medium heat. You only need to cook it long enough to dissolve the sugar and break up the tamarind. You will need to strain the sauce, I just use a slotted spoon. Little specks of tamarind are fine, giant chunks are....unpalatable.
(At this point, one of my friends threw away her sauce because she said that it smelled terrible and she had obviously done something wrong. Fish sauce smells terrible. Hot fish sauce smells even worse. Somehow, though, the combination of these ingredients transforms into something delicious, even if it doesn't smell like roses. You're doin' it right, now keep going.)
Not pictured below: tamarind pulp. Oops, sorry. It is a dark brown sticky mess that is packaged into a dense rectangular shape. I literally cut off chunks with a knife, or take a hard spoon (don't laugh, I've actually bent spoon handles trying to dig out chunks) to take off the pieces I need. Tamarind pulp is probably not an optional ingredient for pad thai, but luckily it has never been hard to find in asian grocers. It is sour and sweet!
 Set aside to use while you cook.
Stir Fry
Heat a large pan, or wok over medium high heat. You will pan fry the shrimp, eggs, and tofu separately so that they are 80% cooked by the time you start to stir fry the noodles. By all means, substitute the shrimp or tofu with anything or nothing else, but please, please at least keep the egg. It is just so good and pad thai without eggs is like...a burger without a patty. Or something equally dramatic.
 Cook the tofu in 1 tablespoon of oil and 1 teaspoon garlic. Let them fry until they begin to turn golden brown. Set aside.
 Cook the shrimp in 1 tablespoon of oil and 1 teaspoon garlic. Fry them 90 seconds on each side or until both sides are pink. Set aside.
 Cook the eggs in 1 tablespoon of oil and 1 teaspoon garlic. Cook just until they are not runny, and look slightly shiny. Do not overcook! Set aside.
 Drain the noodles. You MUST MUST MUST cook noodles in batches. With one package of noodles, I like to cook it in 3 batches.
Please trust me on this. T and I learned one hungry evening how essential this step was. We were too impatient to take the time for this extra step and ended up with a sticky, gunky mess of essentially...steamed noodles. While still good, it was such a waste of what would have otherwise been a wonderful meal.
Take 1/3 of the noodles and begin stir frying them over the highest heat your stove has with 2 tablespoons of oil and 1/3 of the remaining garlic. I know it probably sounds like we've used a ton of oil so far, but let's face it - pad thai is not low-cal dining. I use as little as I can get away with while still having a good end result.
Ladle in 1/5 of the sauce. Just eyeball it, you can be liberal, but like always, taste as you go along. Add in a teaspoon of chili powder. This really helps to make the color of the pad thai 'pop', and gives it that reddish orange hue we so love to see.
 Stir fry this for a minute or two, until the noodles become less rigid and more pliable. Add in 1/3 of the shrimp, tofu, and egg. Since the proteins should more or less be cooked anyway, at this point we are just reheating them and making sure the noodles are well cooked.
  Stir fry them until al dente, STOP before they become mushy! If you are convinced it is too dry, add a few drops of oil and water and keep going. Taste the noodles. Once they have a nice toothsome bite, stir in some scallions if desired and dump them out on a plate.
You can serve chopped peanuts, bean sprouts, scallions, and lime wedges on the side as garnish if you like!

Tom Yum Soup
I had my first encounter with tom yum when I worked at a Thai restaurant in college. I of course had to become acquainted with the menu, not that it was exactly a chore, and first tried the tom kha, a richer coconut-y version of tom yum. I much preferred to tom yum at the time. When I had some difficulty remembering which was which when customers ordered, I even started using the "tom yum is NOT the yummy soup!" mnemonic to help me remember.
I was wrong, of course. Tom yum is SO DELICIOUS. It is tangy, spicy, savory. The perfect appetizer soup because it is so fresh tasting and broth based, so you don't feel full by the time your main course arrives. It's not hard to make but the ingredients aren't your typical household staples.
(4-6 servings)
Ingredients:
:: 2 cups chicken or shrimp stock
:: 3 cups water
:: 2 lemongrass
:: 1 inch of galanga, cut into 3 disc shaped pieces
:: juice of 1 limes to taste
:: 4 tablespoons tom yum paste
:: 2-3 kaffir lime leaves
:: 1 tablespoon fish sauce
:: 1/2 package medium tofu, chopped into 1/2 inch cubes
:: 1 can straw mushrooms, rinsed and drained, cut in half lengthwise (to divide the cap)
-OR- substitute tofu, mushrooms for shrimp, chicken, or nothing at all.
:: thai red chiles to taste
:: cilantro for garnish
SIDEBAR: I made my own shrimp stock for the soup, but only because I didn't have any at home and had a lot of leftover shrimp shells that I never have the heart to throw away. These shells can be difficult to extract later on, so it's useful to have a cloth spice sack or something of that nature just to hold them in one place for easy extraction at the end of the stock making process. I boiled shells from 1 pound of shrimp along with an onion and carrot in 4 cups of water until the vegetables got super soft, at which point I removed the shrimp shells. I added about a cup of chicken stock just because that's what I had laying around the fridge, and went from there. I think that chicken stock would work just fine in this (low sodium, preferably!) but I rarely make the soup without making the pad thai, so I usually start from my own shrimp stock base. Understandably this is an extra pain in the butt, and otherwise I just use a 1:1 ratio of stock to water to begin the soup with. End sidebar.
Back to the soup...
And herein lies the beauty of most soups. You can make them way in advance. In this case, I made the broth after lunch and let it hang out on the stove for a while. Or the night before, or a few days before, whenever you have a chance.
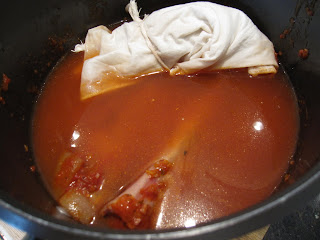
When dinner was 30 minutes away, I combined all the ingredients except for the tofu and mushrooms. I added the lemongrass (the stick-y thing in the right middle of the picture), galanga (the brown ginger-like ingredient in the top right of the picture), the juice of one lime, 1 tablespoon of fish sauce, and 4 tablespoons of tom yum paste. I was hesitant to add in the chiles just yet in case I wasn't able to control the spice level and it got too out of hand.
If you'll notice, I have no kaffir lime leaves in the picture. Hard enough to find in normal circumstances, the store owner informed me that kaffir lime leaves are currently illegal to sell in supermarkets. I have no idea if this is true or not but he is probably a better authority on supermarket-able goods than I, so maybe you'll have better luck. It really is nice to have the leaves because they have a very un-substitutable fresh, tangy flavor, but just make do with what you have.
 I have used tom yum paste in my recipe, which many recipes 'from scratch' do not use. The intensity of the flavors has been difficult to achieve if I do not use it, but I hope that adding in fresh ingredients of my own makes the soup taste like it is not prepackaged. I think it's delicious and doesn't suffer from having the paste added in (the paste itself is just a mixture of chiles, kaffir lime leaf, lemongrass, galanga, etc anyway, just in a more potent mixture).
 The mushrooms I cut in half because 1) they're a little large for bite-size pieces and 2) my family pointed out to me that it makes the ingredients seem to stretch farther. I added those in with the bite-size tofu 5 minutes before dinner, just long enough to warm them through without getting soggy.
I'd like to take a moment to stress the importance of tasting as you cook. You may find that the ingredient portions I use are not suited to you, that you like your soup a little saltier, a little spicier, more vegetarian, whatever. This recipe was largely based on tasting and thinking "Hmm that could use more _____." Go with your gut! Usually you will be right...as long as you TASTE before you ADD.
Add some cilantro for garnish... serve with a giant soup spoon!

I was wrong, of course. Tom yum is SO DELICIOUS. It is tangy, spicy, savory. The perfect appetizer soup because it is so fresh tasting and broth based, so you don't feel full by the time your main course arrives. It's not hard to make but the ingredients aren't your typical household staples.
(4-6 servings)
Ingredients:
:: 2 cups chicken or shrimp stock
:: 3 cups water
:: 2 lemongrass
:: 1 inch of galanga, cut into 3 disc shaped pieces
:: juice of 1 limes to taste
:: 4 tablespoons tom yum paste
:: 2-3 kaffir lime leaves
:: 1 tablespoon fish sauce
:: 1/2 package medium tofu, chopped into 1/2 inch cubes
:: 1 can straw mushrooms, rinsed and drained, cut in half lengthwise (to divide the cap)
-OR- substitute tofu, mushrooms for shrimp, chicken, or nothing at all.
:: thai red chiles to taste
:: cilantro for garnish
SIDEBAR: I made my own shrimp stock for the soup, but only because I didn't have any at home and had a lot of leftover shrimp shells that I never have the heart to throw away. These shells can be difficult to extract later on, so it's useful to have a cloth spice sack or something of that nature just to hold them in one place for easy extraction at the end of the stock making process. I boiled shells from 1 pound of shrimp along with an onion and carrot in 4 cups of water until the vegetables got super soft, at which point I removed the shrimp shells. I added about a cup of chicken stock just because that's what I had laying around the fridge, and went from there. I think that chicken stock would work just fine in this (low sodium, preferably!) but I rarely make the soup without making the pad thai, so I usually start from my own shrimp stock base. Understandably this is an extra pain in the butt, and otherwise I just use a 1:1 ratio of stock to water to begin the soup with. End sidebar.
Back to the soup...
And herein lies the beauty of most soups. You can make them way in advance. In this case, I made the broth after lunch and let it hang out on the stove for a while. Or the night before, or a few days before, whenever you have a chance.
When dinner was 30 minutes away, I combined all the ingredients except for the tofu and mushrooms. I added the lemongrass (the stick-y thing in the right middle of the picture), galanga (the brown ginger-like ingredient in the top right of the picture), the juice of one lime, 1 tablespoon of fish sauce, and 4 tablespoons of tom yum paste. I was hesitant to add in the chiles just yet in case I wasn't able to control the spice level and it got too out of hand.
If you'll notice, I have no kaffir lime leaves in the picture. Hard enough to find in normal circumstances, the store owner informed me that kaffir lime leaves are currently illegal to sell in supermarkets. I have no idea if this is true or not but he is probably a better authority on supermarket-able goods than I, so maybe you'll have better luck. It really is nice to have the leaves because they have a very un-substitutable fresh, tangy flavor, but just make do with what you have.
 I have used tom yum paste in my recipe, which many recipes 'from scratch' do not use. The intensity of the flavors has been difficult to achieve if I do not use it, but I hope that adding in fresh ingredients of my own makes the soup taste like it is not prepackaged. I think it's delicious and doesn't suffer from having the paste added in (the paste itself is just a mixture of chiles, kaffir lime leaf, lemongrass, galanga, etc anyway, just in a more potent mixture).
 The mushrooms I cut in half because 1) they're a little large for bite-size pieces and 2) my family pointed out to me that it makes the ingredients seem to stretch farther. I added those in with the bite-size tofu 5 minutes before dinner, just long enough to warm them through without getting soggy.
I'd like to take a moment to stress the importance of tasting as you cook. You may find that the ingredient portions I use are not suited to you, that you like your soup a little saltier, a little spicier, more vegetarian, whatever. This recipe was largely based on tasting and thinking "Hmm that could use more _____." Go with your gut! Usually you will be right...as long as you TASTE before you ADD.
Add some cilantro for garnish... serve with a giant soup spoon!

Fresh Spring Rolls
Let me start off first by saying: This is not a "I am short on time and need to make a quick dinner" type of meal. Depending on how well stocked your pantry is, this could potentially be an all day affair to make sure that you have all the ingredients for each dish, the prep work, and the actual cooking process. I obviously find this process worthwhile and delicious, but be prepared to work for your meal!
Fresh Spring Rolls:
(Makes approximately 25 rolls)
:: 1 bunch each of mint, cilantro, thai basil
:: 1 1/2 cucumber (or 2-3 small cucumbers), peeled, cut into skinny matchsticks
:: shrimp sliced in half butterfly style (I use 1 1/2 shrimp per roll, you can omit, add more in, whatever. These do NOT need to be nice large ones, 36-45+ (meaning 36-45 shrimp per pound) work just fine
:: round tapioca sheets (for this and the rice stick noodles, I can't explain how to choose from among the billions of options. Your best bet is to ask whoever the store owner is and hopefully they will be able to point you in the right direction. I've had more luck in mom and pop grocers than the big chains, but good luck!)
:: 1 package rice stick noodles
Sauce:
:: hoisin sauce
:: peanut butter (creamy or crunchy is fine!)
:: chopped peanuts (optional)
:: rice wine vinegar
Rinse the herbs, feel free to leave them on stems as you will be picking off pieces individually for each roll anyway.
Boil the shrimp. Shrimp barely need any time to cook at all - once the water comes to a rolling boil after you dump the shrimp in they should be finished. Rinse thoroughly in cold water. At this point, you can cut the shrimp in half along the 'c' curve of the shrimp to make them flatter and easier to wrap. Drain, set aside.
Boil the rice stick noodles. They need to be 'al dente' when you're finished. Immediately rinse them thoroughly with cold water - after the rinsing they shouldn't be warm at all! Drain, set aside.
 Make your assembly line! This is important to us lazy cooks so that you can sit down and wrap from beginning to end without moving around a lot.
 If you notice the wide and shallow blue pan on the bottom right of the image, it is filled with WARM water. Don't make it hot enough to scald your fingers, but it should feel closer to bathwater than to the tap. This is what you will use to dip the tapioca sheets in to make them pliable enough to roll.
 Take the tapioca sheets one at a time (don't try to dip them all and set aside; they will form a sticky mess that you will not be able to separate). It needs a very quick dip, only long enough to ensure that all edges have been saturated. It will still feel rigid but will soften up by the time you get to rolling. 5 seconds maximum, trust me!
 Assemble! For reference, the bottom of the picture is towards me as I'm rolling. There is a thin layer of rice stick noodles over which I have put a few strips of cucumber, 2-3 thai basil leaves, 2 sprigs of cilantro, and 3-4 mint leaves. The shrimp are offset and slightly above the rest so that when you roll it up, hopefully the shrimp will show up on the surface to make your presentation pretty.
 Fold the bottom edge over the herbs.
 Fold in the edges.
 This part is important and will determine how "loose" your spring roll is, or how tightly it's bound when you bite into it. Roll up from bottom to top and make sure that everything is tucked in nicely. This will take a few trials to get used to, but since the ugly trial ones can be used to...erm...taste test, no one usually minds. Voila!
 The sauce. Ohh, the sauce. I think this is a pretty simple, poor man's version of a good peanut sauce. It has its faults because it can oftentimes be too thick, too sweet, and too salty due to the nature of its few ingredients. I have often wondered the best way to cut some of the textural and overseasoned sauciness of it, but so far all I have come up with is to add a few drops of rice wine vinegar. The acidity seems to help a lot. Thoughts? Tahini paste? Water?!
THAT BEING SAID....I think perhaps I am too picky, though, because no one else in my family seems to mind eating it and usually I end up making twice as much as I intend to even though I think it's not possible to eat all of the sauce....and then by the end of the meal it's gone. My grandma started slathering it all over her pad thai, so if that's any indication.
And at the end of the day, it's a flippin' 3-4 ingredient sauce. How much simpler do you get?

Please don't get upset with me for not including measurements here. Asian cooking and measuring spoons have never mixed for me. I just do it by taste; if I had to guess, it's 2 parts hoisin to 1 part peanut butter. Stir it all up nicely and you should get a thick, creamy sauce! Here is where you add some vinegar to loosen up, if desired.
 Bon Appetit!
*EDIT*
Fresh Spring Rolls:

(Makes approximately 25 rolls)
:: 1 bunch each of mint, cilantro, thai basil
:: 1 1/2 cucumber (or 2-3 small cucumbers), peeled, cut into skinny matchsticks
:: shrimp sliced in half butterfly style (I use 1 1/2 shrimp per roll, you can omit, add more in, whatever. These do NOT need to be nice large ones, 36-45+ (meaning 36-45 shrimp per pound) work just fine
:: round tapioca sheets (for this and the rice stick noodles, I can't explain how to choose from among the billions of options. Your best bet is to ask whoever the store owner is and hopefully they will be able to point you in the right direction. I've had more luck in mom and pop grocers than the big chains, but good luck!)
:: 1 package rice stick noodles
Sauce:
:: hoisin sauce
:: peanut butter (creamy or crunchy is fine!)
:: chopped peanuts (optional)
:: rice wine vinegar
Rinse the herbs, feel free to leave them on stems as you will be picking off pieces individually for each roll anyway.
Boil the shrimp. Shrimp barely need any time to cook at all - once the water comes to a rolling boil after you dump the shrimp in they should be finished. Rinse thoroughly in cold water. At this point, you can cut the shrimp in half along the 'c' curve of the shrimp to make them flatter and easier to wrap. Drain, set aside.
Boil the rice stick noodles. They need to be 'al dente' when you're finished. Immediately rinse them thoroughly with cold water - after the rinsing they shouldn't be warm at all! Drain, set aside.
 Make your assembly line! This is important to us lazy cooks so that you can sit down and wrap from beginning to end without moving around a lot.
 If you notice the wide and shallow blue pan on the bottom right of the image, it is filled with WARM water. Don't make it hot enough to scald your fingers, but it should feel closer to bathwater than to the tap. This is what you will use to dip the tapioca sheets in to make them pliable enough to roll.
 Take the tapioca sheets one at a time (don't try to dip them all and set aside; they will form a sticky mess that you will not be able to separate). It needs a very quick dip, only long enough to ensure that all edges have been saturated. It will still feel rigid but will soften up by the time you get to rolling. 5 seconds maximum, trust me!
 Assemble! For reference, the bottom of the picture is towards me as I'm rolling. There is a thin layer of rice stick noodles over which I have put a few strips of cucumber, 2-3 thai basil leaves, 2 sprigs of cilantro, and 3-4 mint leaves. The shrimp are offset and slightly above the rest so that when you roll it up, hopefully the shrimp will show up on the surface to make your presentation pretty.
 Fold the bottom edge over the herbs.
 Fold in the edges.
 This part is important and will determine how "loose" your spring roll is, or how tightly it's bound when you bite into it. Roll up from bottom to top and make sure that everything is tucked in nicely. This will take a few trials to get used to, but since the ugly trial ones can be used to...erm...taste test, no one usually minds. Voila!
 The sauce. Ohh, the sauce. I think this is a pretty simple, poor man's version of a good peanut sauce. It has its faults because it can oftentimes be too thick, too sweet, and too salty due to the nature of its few ingredients. I have often wondered the best way to cut some of the textural and overseasoned sauciness of it, but so far all I have come up with is to add a few drops of rice wine vinegar. The acidity seems to help a lot. Thoughts? Tahini paste? Water?!
THAT BEING SAID....I think perhaps I am too picky, though, because no one else in my family seems to mind eating it and usually I end up making twice as much as I intend to even though I think it's not possible to eat all of the sauce....and then by the end of the meal it's gone. My grandma started slathering it all over her pad thai, so if that's any indication.
And at the end of the day, it's a flippin' 3-4 ingredient sauce. How much simpler do you get?

Please don't get upset with me for not including measurements here. Asian cooking and measuring spoons have never mixed for me. I just do it by taste; if I had to guess, it's 2 parts hoisin to 1 part peanut butter. Stir it all up nicely and you should get a thick, creamy sauce! Here is where you add some vinegar to loosen up, if desired.
 Bon Appetit!
*EDIT*
If you want to make these ahead of time, it's fine to wrap them the day or morning of when you intend to serve them. I feel pretty safe letting the rolls sit in room temperature for 6-8 hours or so, but perhaps my attitude towards possible food poisoning is a little too casual for your taste. Just cover them with a damp paper towel or cloth, otherwise they will dry out.
DON'T make them the day ahead. Once refrigerated, the tapioca sheets become really irreversibly hard and unpleasant - they don't really soften up once coming up to room temperature, either.
If you prefer something lighter, another yummy dipping sauce alternative is sweet chili sauce. I like the Mae Ploy brand, but probably only because I've never used any of the others! (amazon.com lists it as $8..... I'm pretty sure it's usually $2-3 at most markets.) It is very mildly spicy, sweet, and tangy - like a much better version of duck sauce you eat with chinese egg rolls.
Subscribe to:
Posts (Atom)